How To Take Product Photos
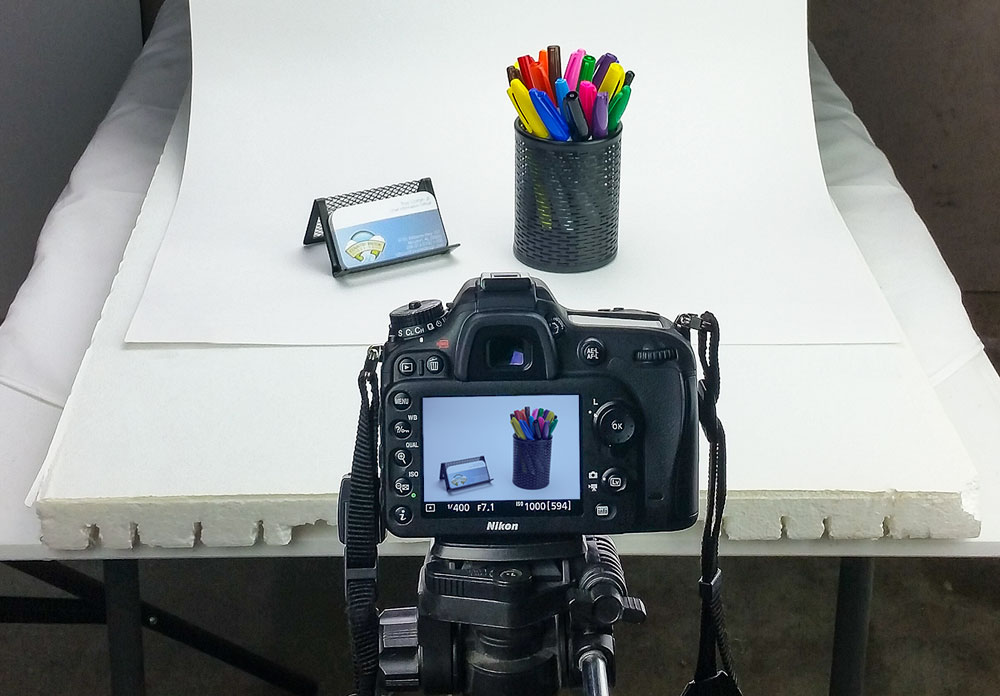
When it comes to selling your crafts online, posting an excellent photo is as important as making something beautiful. Your customers won't have a chance to touch your product or see it on a shelf, so your pictures have to do the selling. Keep in mind that a large e-commerce site like Amazon will display competitors alongside your product. If this is the first or only exposure for your product, you surely don't want to waste an opportunity to attract attention that will translate to future sales.
A compelling photo might not require great talent but it does require some thought and preparation. You can get professional results even if you don't have a state-of-the-art studio in your spare bedroom. (If you do, stop reading and go take some more really great pictures.)
Entire books and college courses are dedicated to taking outstanding photos. Detailed user guides are included with every camera sold yet most of us just use our smartphones for everyday pictures, don't we? Sometimes figuring f-stops and using light meters is just too much! For those who are just here for some insider information that will make your wares look spectacular … read on.
Our Product Photo Professional Speaks Up
One thing I've learned over the years -- find someone whose work you admire and pick their brain. That's why I tossed questions to Country Brook Design's resident photographer, Colin Riddle. Our website has thousands of pictures that were taken in our "studio" and obviously, Colin has learned a few things about making products stand out in the online marketplace.
Colin has mastered the technique of producing high quality product images for our online marketplaces because he knows exactly what the outcome should be before he ever turns on the first light in his studio. Working smart in the studio means less hard work on the computer as he crops and edits each image.
This article will fall somewhere in the middle of highly technical and point-and-shoot. We promise to keep it user-friendly and easy to comprehend. You'll find good basic information about the following topics and links for further reading if you need more details than we provide.
Marketplace Requirements
We realize how difficult it is to keep up with marketplace requirements, especially when they seem to change constantly. To make that somewhat easier for you, we created the chart below. As of this publication date, it is accurate. Our advice is to do what we do: check the sites periodically to make sure your photos meet the requirements.
There are some basic guidelines that apply across the board but keep in mind that an image that works for one site might be denied on another. You should always check the uploaded image to make sure you have what you want.
| *Hold the control (ctrl) key, then press D to bookmark this reference guide. | ||||
| Amazon | eBay | Etsy | Rakuten | |
|---|---|---|---|---|
| General: | All images must be In focus, professionally lit, realistic color, smooth edges | No borders unless created naturally by a neutral background | Main image must be landscape or square | Professionally done, realistic color, smooth edges |
| Pixels or Image Requirements: | 1000+ pixels; TIFF; JPEG; GIF; PNG | Minimum 500 pixels; 800-1600 pixels automatically zoom | Maximum width: 800-1000 pixels | JPEG and GIF images; 500 X 500 pixels |
| Backgrounds: | Pure white (RGB 255,255,255) | N/A | N/A | Pure white (RGB 255,255,255) |
| Watermark: | Not allowed | Allowed | Not Allowed | Not Allowed |
| Notes: | All items shown in main image must be included in the the price. Image files must include product identifier.* Additional views may include objects to show use or scale. May also include text/graphics within photo and close-ups. | No text or photos allowed on images. | N/A | Images cannot include text, graphics, or insets. Sellers must provide a URL to the image host site. |
| Learn More: | Amazon help | eBay help | Etsy help | Rakuten help |
Three Components That Produce Great Results
No matter what craft or product you are photographing, there are three components to consider that will influence the image outcome.
- Lighting - using natural or artificial lighting and how a lightbox works for both
- Composition - simple background ideas and one rule that can ensure success every time
- Photo Editing - a good image becomes great with filters, proper cropping, and the right resolution
Lighting
Use a DIY light box outdoors to prevent shadows and unwanted color casting.
If you can use natural light, do so. It can be your best friend and it's free. Shoot near a large window or set up in the garage with the door raised.
You can also set up an area outdoors. Be aware that afternoon light might help you avoid harsh shadows but it will also give a yellow hue to your images.
When natural light isn't an option, you will have to shoot indoors. Setting up indoors allows you to control the environment -- no wind, no rain, no random leaves (or other things) dropping onto your staging area. Your setup will also be ready day or night to suit your schedule.
Natural light through windows can be direct and harsh at certain times of the day. To overcome hard light, glare, and shadows, create a simple low-cost light diffuser for the window by taping white garbage bags over the glass. You can also soften camera flash by taping white tissue paper over the flash. Don't forget to turn your flash to "off" if you are shooting a reflective surface.
Here are a few things to remember:
- Turn off overhead lighting to eliminate unwanted glare or shadows.
- Bounce light from your flash by taping a bent white index card to the side of the flash.
- Reflectors such as pure white poster board or aluminum foil create fill light which eliminates shadows.
Adjusting exposure in the editing process is much easier without pesky shadows. If you're shooting something very small, a type of lightbox known as a softbox works well to create indirect, diffused lighting. With a cardboard box, white tissue paper, a hobby knife, straight edge, and some tape, you can construct one. This helpful link will show you how to build a light-diffusing box:
Composition
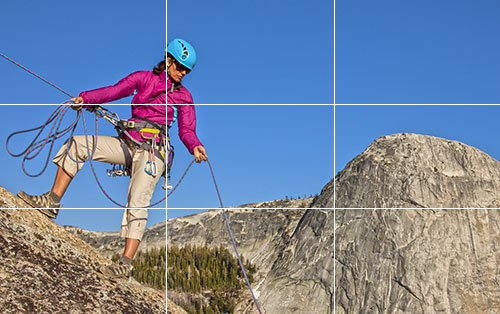 Focus is on the harness used by the rock climber.
Simplicity usually works best. Pick background colors that don't clash with what you've made. Online marketplaces like Amazon, eBay, Etsy, and Rakuten state that submitted photos must use a pure white background. There are no exceptions allowed. However, you can cover a work desk with white craft paper for an easy photo area.
Avoid using anything reflective as your background. It'll cause a glare and show anything behind the shoot area, including you. Self-portraits are rarely good sellers.
Pictures from several angles allow a potential buyer to see different sides of the product. Use wide shots but don't forget to zoom in on small details.
In photography, the 'rule of thirds' reigns over the landscape (and the portrait.) It is just what it sounds like. When you consider your "frame", imagine lines dividing it into three equal vertical parts and three equal horizontal parts.
This will give you nine invisible lines to work with. Despite the subject, every image will have four places where these lines intersect. That's where you want to place your points of interest because that is where the human eye naturally focuses.
Following this rule will ensure viewers are drawn to the most important part of your image. Ignoring it can render your photo less effective than it should be. Don't worry if you have to deliberately work at it at first. While it might come naturally to a few folks, most of us have to work a little before it is ingrained.
Look at professional and amateur photos. Look back at some you've taken in the past. Try to learn from them. Many online tutorials are available but we really like the Digital Photography School post Rule of Thirds. You'll find grids and actual photos that will help you understand and master the concept.
Creativity
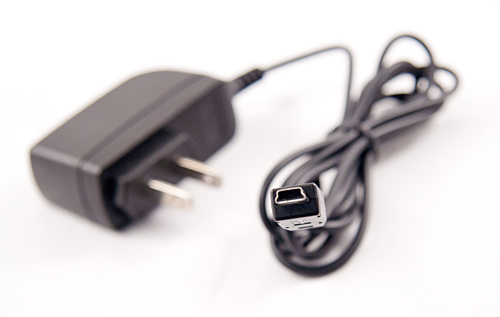 Focusing on the port quickly provides information!
Just because you can be creative with every shot … consider that you might not need to be. In other words, don't overcreate the shot. But don't be afraid to take chances either! The immediate feedback of digital photography is priceless. Delete photos you don't like and begin again. You will learn something useful with your mistakes.
Recently, Colin needed to take a picture of a mini USB charger for listing online. This could have been pretty boring and run-of-the-mill. Instead, when he let his creativity loose, he came up with a picture that did the work of words.
The most important question for those in the target audience is "Will this work for my device?" By focusing on the actual charger plug and blurring out the charger adapter and cable, Colin immediately led the viewer's eye to the shape of the plug.
Image Efficiency
Colin asks himself the following questions when he composes a shot:
- Does this photo tell the story?
- Does it get the job done?
- If I saw this photo, would it show me all I need to see?
According to Colin, if you can answer 'yes' to these questions, all is well!
Photo Editing
For many, Photoshop is a helpful way to make the most of your images. Tutorials and simple how-tos are easily found with a simple search. There are good basic photo editing software programs that you can find with a quick online search. You'll find Paint Net to be user-friendly and free.
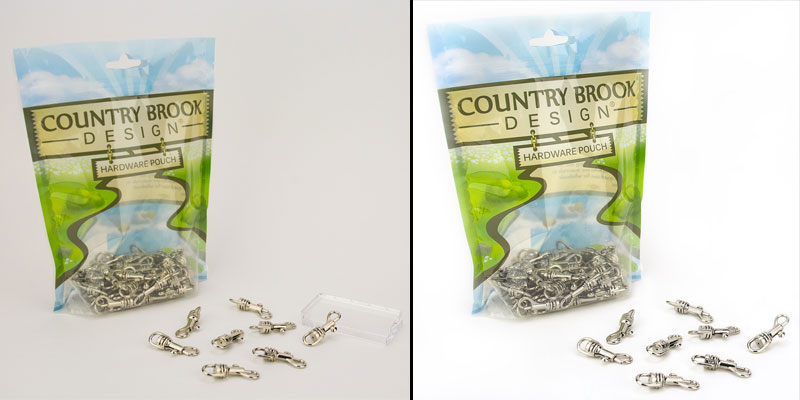 Before and after cropping and editing. What a difference a few clicks make.
- Get familiar with filters as a way to improve bad lighting and brighten pictures.
- Color saturation can help make your pieces look truer to life, but make sure to use sparingly. Too much and your customers may become angry when the product they purchase looks nothing like the photo.
- Diffusing the edges of an image can bring greater focus to your piece. As with everything, use it sparingly so that the effect is subtle.
Believe it or not, some amateur photographers overlook the importance of proper cropping. Make sure you eliminate the edges of the staging area. Move the crop tool around if you need to. Remember the 'rule of thirds' continues to apply throughout the cropping step so make sure you don't move points of focus for the product when you are cropping the image.
Resolution is important! As a general rule, the higher the resolution, the better the picture. High resolution also allows viewers to zoom in for details without losing image quality. You can use an economical digital camera that allows for high-resolution images. (Country Brook Design® graphics specialists recommend at least 16 megapixels.)
Pinterest recommends high-quality, high-resolution, vertical images that measure a minimum width of 600 pixels.
Little Things Matter
While the human brain might overlook flaws in real life, a still image will not be so forgiving. Wrinkles, scars, and background "noise" i.e. clutter can be distractions in an image.
Unless you have access to a professional hand model, avoid taking pictures of rings while they're being worn. Wrinkles, a bright nail polish, age spots, rough cuticles, and scars can be distracting.
When selling any sort of crafted jewelry online, remember that necklaces can accent cleavage. Bracelets on bare wrists can highlight arm hairs or dry skin. If you feel that the shot needs someone wearing your piece, look over the photo carefully and use photo editing to erase flaws.
Avoid a cluttered picture by keeping the background clean. A plain wall or a cloth backdrop works fine. If you're zooming out, keep the sides clear of any household items or crafting materials. Cropping will be your friend.
Build Your Set with Everyday Items
Backdrops
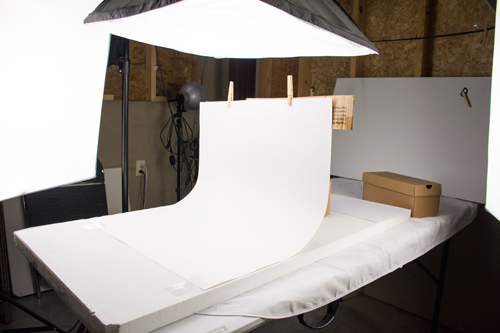 White poster board is cheap and plentiful. Just don't crease it!
- White poster board
- Construction paper
- White sheets (stain-free)
- Clean blankets
- Burlap
- Canvas material
Props
- Small boxes
- Ring boxes
- Cell phone boxes (cover or paint)
- Shoe boxes (paint with clean colors or pure white)
- Small shipping boxes (cover with paper)
Set Up Ideas
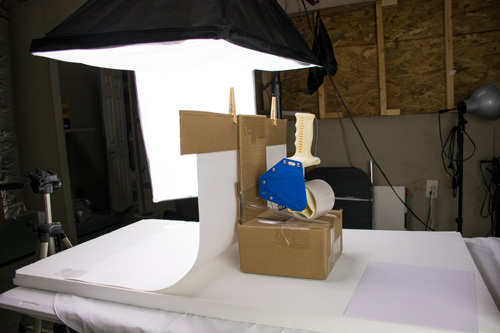 Clothespins, cardboard,and tape working hard behind the scenes.
- Drape a sheet over the back of a chair so it falls smoothly to the floor. Secure the sheet to the floor with out-of-range heavy objects or tape.
- Tape construction paper to the side of a small box. Bend the paper will provide a "seamless" look. Secure it to the floor or table top with tape.
- Always avoid creasing paper or poster board because this will create lines. Bend, then tape to secure.
- Iron sheets or material to remove wrinkles. Pull fabric taut to eliminate folds.
- Your goal is to create as seamless a look as possible!
I asked Colin to share with our readers how he works his photo magic in the Country Brook Design studio. The resulting 39-second video shows a recent photo shoot from set up to final result. You'll find the slow-mo details written down for you in this article so you can achieve the same results at home.
Great Photos Sell Products
Selling crafts online can be a fun and rewarding process. Learn to think like your customers think. Ask yourself if you would buy your product if all you knew about it was learned from the photo. Follow the rules for online marketplace images and check for changes. When you keep it simple and well done, your photo will become your best salesperson!
 Review and Win! Share your verified review and get a chance to win a $25 store credit!